> For the complete documentation index, see [llms.txt](https://ja.docs.monaca.io/llms.txt). Markdown versions of documentation pages are available by appending `.md` to page URLs; this page is available as [Markdown](https://ja.docs.monaca.io/migration-guide/nifcloud/authentication/firebase-authentication-pasuwdosanpuru.md).
# Firebase Authentication パスワード再設定サンプル
本項では、Firebase Authenticationのパスワード再設定を行うサンプルアプリを解説します。
サンプルアプリの仕様は次の通りです。
1. メールアドレスを入力し、パスワード再設定メールを送信する
2. パスワード再設定メールには、パスワード再設定画面のリンクが記載されている(Firebaseの機能)
3. メール記載のリンクからパスワード再設定画面にアクセスし、パスワードの再設定を行う(Firebaseの機能)
4. メールアドレスと再設定したパスワードでアプリにログインする
5. ログイン状態を画面に表示する
6. ログアウトする
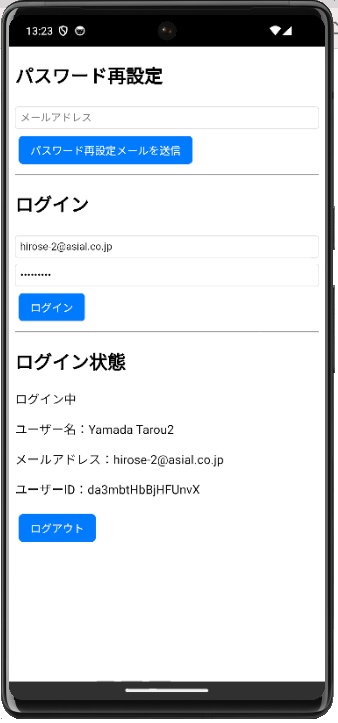
これらのうち、2と3はFirebaseの機能です。そのため、サンプルアプリでは1、4、5、6を実装します。 完成したアプリのイメージは次のようになります。
 本ドキュメントで扱うコードのオリジナルプロジェクトは、GitHubリポジトリにて公開しています。
{% embed url="" %}
## Authetication初期化
Authenticationを使用するには、まずFirebaseのSDKをインポートし、Firebaseプロジェクトの設定を行います。 ウェブアプリの設定情報には、Firebaseコンソールから取得した設定情報を使用します。ウェブアプリの登録と設定情報の取得手順は、[こちら](https://ja.docs.monaca.io/external-service-integration-guide/firebase/app-registration#webuapurinotono)を確認してください。
```javascript
// FirebaseのSDKをインポート
import { initializeApp } from "https://www.gstatic.com/firebasejs/10.7.0/firebase-app.js";
import { getAuth, connectAuthEmulator, sendPasswordResetEmail, signInWithEmailAndPassword, onAuthStateChanged, signOut, initializeAuth, browserLocalPersistence } from "https://www.gstatic.com/firebasejs/10.7.0/firebase-auth.js";
// Firebaseの設定
const firebaseConfig = {
};
// Firebaseの初期化
const app = initializeApp(firebaseConfig);
// iOSを判定する関数
const isIos = () => {
const userAgent = navigator.userAgent;
return /iPad|iPhone|iPod/i.test(userAgent);
}
// Authenticationのインスタンスを取得
let auth;
if (isIos()) {
auth = initializeAuth(app, {
persistence: browserLocalPersistence,
})
} else {
auth = getAuth(app);
}
auth.languageCode = 'ja'; // パスワードリセットメールやパスワードリセット画面の言語設定
// connectAuthEmulator(auth, "http://127.0.0.1:9099"); // Emulatorを起動する場合、コメントを外す
```
変数`auth` の初期化は、iOS端末の場合、デフォルトの`getAuth(app)` ではエラーになるため、次のように初期化します。
```javascript
auth = initializeAuth(app, {
persistence: browserLocalPersistence,
})
```
## パスワード再設定メール送信
下記のコードは「パスワード再設定メールを送信」ボタンがタップされた時に実行されます。
Authenticationでは `sendPasswordResetEmail` 関数にメールアドレスを指定してパスワード再設定メールを送信します。
```javascript
const onClickSendPasswordResetEmail = () => {
const email = document.getElementById("emailForPasswordReset").value;
sendPasswordResetEmail(auth, email)
.then(() => {
alert("パスワードリセットメールを送信しました");
})
.catch((error) => {
alert("パスワードリセットメールを送信に失敗しました");
console.error(error);
});
};
```
次のような本文でメールがFirebaseから送信されます。
```markup
お客様
xxxxxxxxxx の example@example.com アカウントのパスワードをリセットするには、次のリンクをクリックしてください。
https://xxxxxxxxxx.firebaseapp.com/__/auth/action?mode=resetPassword&oobCode=YYYYYYYYYYYYYYYYYYYY&apiKey=ZZZZZZZZZZZZZZZZZZZZ&lang=ja
パスワードのリセットを依頼していない場合は、このメールを無視してください。
よろしくお願いいたします。
xxxxxxxxxx チーム
```
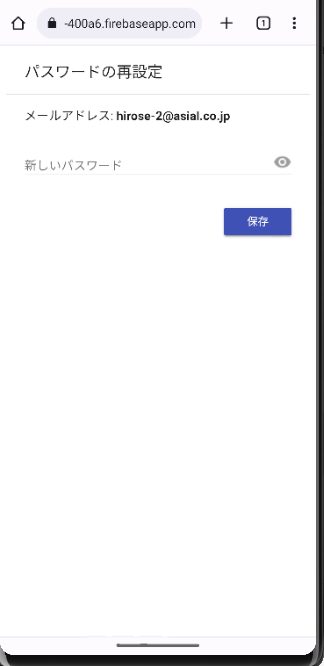
メールのリンクをクリックすると次のような画面が表示され、パスワードの再設定ができます。
本ドキュメントで扱うコードのオリジナルプロジェクトは、GitHubリポジトリにて公開しています。
{% embed url="" %}
## Authetication初期化
Authenticationを使用するには、まずFirebaseのSDKをインポートし、Firebaseプロジェクトの設定を行います。 ウェブアプリの設定情報には、Firebaseコンソールから取得した設定情報を使用します。ウェブアプリの登録と設定情報の取得手順は、[こちら](https://ja.docs.monaca.io/external-service-integration-guide/firebase/app-registration#webuapurinotono)を確認してください。
```javascript
// FirebaseのSDKをインポート
import { initializeApp } from "https://www.gstatic.com/firebasejs/10.7.0/firebase-app.js";
import { getAuth, connectAuthEmulator, sendPasswordResetEmail, signInWithEmailAndPassword, onAuthStateChanged, signOut, initializeAuth, browserLocalPersistence } from "https://www.gstatic.com/firebasejs/10.7.0/firebase-auth.js";
// Firebaseの設定
const firebaseConfig = {
};
// Firebaseの初期化
const app = initializeApp(firebaseConfig);
// iOSを判定する関数
const isIos = () => {
const userAgent = navigator.userAgent;
return /iPad|iPhone|iPod/i.test(userAgent);
}
// Authenticationのインスタンスを取得
let auth;
if (isIos()) {
auth = initializeAuth(app, {
persistence: browserLocalPersistence,
})
} else {
auth = getAuth(app);
}
auth.languageCode = 'ja'; // パスワードリセットメールやパスワードリセット画面の言語設定
// connectAuthEmulator(auth, "http://127.0.0.1:9099"); // Emulatorを起動する場合、コメントを外す
```
変数`auth` の初期化は、iOS端末の場合、デフォルトの`getAuth(app)` ではエラーになるため、次のように初期化します。
```javascript
auth = initializeAuth(app, {
persistence: browserLocalPersistence,
})
```
## パスワード再設定メール送信
下記のコードは「パスワード再設定メールを送信」ボタンがタップされた時に実行されます。
Authenticationでは `sendPasswordResetEmail` 関数にメールアドレスを指定してパスワード再設定メールを送信します。
```javascript
const onClickSendPasswordResetEmail = () => {
const email = document.getElementById("emailForPasswordReset").value;
sendPasswordResetEmail(auth, email)
.then(() => {
alert("パスワードリセットメールを送信しました");
})
.catch((error) => {
alert("パスワードリセットメールを送信に失敗しました");
console.error(error);
});
};
```
次のような本文でメールがFirebaseから送信されます。
```markup
お客様
xxxxxxxxxx の example@example.com アカウントのパスワードをリセットするには、次のリンクをクリックしてください。
https://xxxxxxxxxx.firebaseapp.com/__/auth/action?mode=resetPassword&oobCode=YYYYYYYYYYYYYYYYYYYY&apiKey=ZZZZZZZZZZZZZZZZZZZZ&lang=ja
パスワードのリセットを依頼していない場合は、このメールを無視してください。
よろしくお願いいたします。
xxxxxxxxxx チーム
```
メールのリンクをクリックすると次のような画面が表示され、パスワードの再設定ができます。
 ## ログイン
パスワード再設定ができたら、ログインできるか確認します。
下記のコードは「ログイン」ボタンがタップされた時に実行されます。 Authenticationの`signInWithEmailAndPassword` 関数にメールアドレス、パスワードを指定して実行します。
```javascript
const onClickLogin = () => {
const email = document.getElementById("email").value;
const password = document.getElementById("password").value;
signInWithEmailAndPassword(auth, email, password)
.then((userCredential) => {
// ログイン成功
alert("ログインしました");
const user = userCredential.user;
console.log(user);
})
.catch((error) => {
alert("ログインエラーです");
console.error(error);
});
};
```
## ログイン状態の反映
ログインに成功した時の画面の表示を変える処理を解説します。
Authenticationの `onAuthStateChanged` 関数は、ログイン状態に変更があった場合に実行されるイベントハンドラです。 サンプルアプリでは`renderLoginStatus` 関数を実行してログイン状態を画面に反映させています。
```javascript
onAuthStateChanged(auth, (user) => {
renderLoginStatus(user);
});
const renderLoginStatus = (user) => {
const loginStatus = document.getElementById("loginStatus");
let html = `
## ログイン
パスワード再設定ができたら、ログインできるか確認します。
下記のコードは「ログイン」ボタンがタップされた時に実行されます。 Authenticationの`signInWithEmailAndPassword` 関数にメールアドレス、パスワードを指定して実行します。
```javascript
const onClickLogin = () => {
const email = document.getElementById("email").value;
const password = document.getElementById("password").value;
signInWithEmailAndPassword(auth, email, password)
.then((userCredential) => {
// ログイン成功
alert("ログインしました");
const user = userCredential.user;
console.log(user);
})
.catch((error) => {
alert("ログインエラーです");
console.error(error);
});
};
```
## ログイン状態の反映
ログインに成功した時の画面の表示を変える処理を解説します。
Authenticationの `onAuthStateChanged` 関数は、ログイン状態に変更があった場合に実行されるイベントハンドラです。 サンプルアプリでは`renderLoginStatus` 関数を実行してログイン状態を画面に反映させています。
```javascript
onAuthStateChanged(auth, (user) => {
renderLoginStatus(user);
});
const renderLoginStatus = (user) => {
const loginStatus = document.getElementById("loginStatus");
let html = `未ログイン
`;
if (user) {
html = `
ログイン中
ユーザー名:${user.displayName}
メールアドレス:${user.email}
ユーザーID:${user.uid}
`;
}
loginStatus.innerHTML = html;
if (user) {
document.getElementById('logoutButton').addEventListener('click', onClickLogout);
}
}
```
## ログアウト
最後に、ログアウトする処理を解説します。
下記のコードは「ログアウト」ボタンがタップされた時に実行されます。 `Authethentication` の`signOut` 関数を実行します。 ログアウトに成功すると前述の`onAuthStateChanged` 関数が実行され、画面の表示が未ログイン状態になります。
```javascript
const onClickLogout = () => {
signOut(auth).then(() => {
alert("ログアウトしました");
}).catch((error) => {
console.error(error);
});
};
```
## エミュレーターを利用する
Firebaseのクラウド環境に接続して移行を行う前に、ローカル環境でFirebaseのエミュレーターを稼働させてデータの移行を検証できます。
1. Firebaseのエミュレーターを起動する。
```sh
npm run emulators:start
```
2. `www/app.js` の下記のコメントアウトを外してください。
```javascript
// connectAuthEmulator(auth, "http://127.0.0.1:9099"); // Emulatorを起動する場合、コメントを外す
```
{% embed url="" %}
3. 下記のコマンドを実行すると、ローカル環境のブラウザで動作を確認できます。
```sh
npm run dev
```
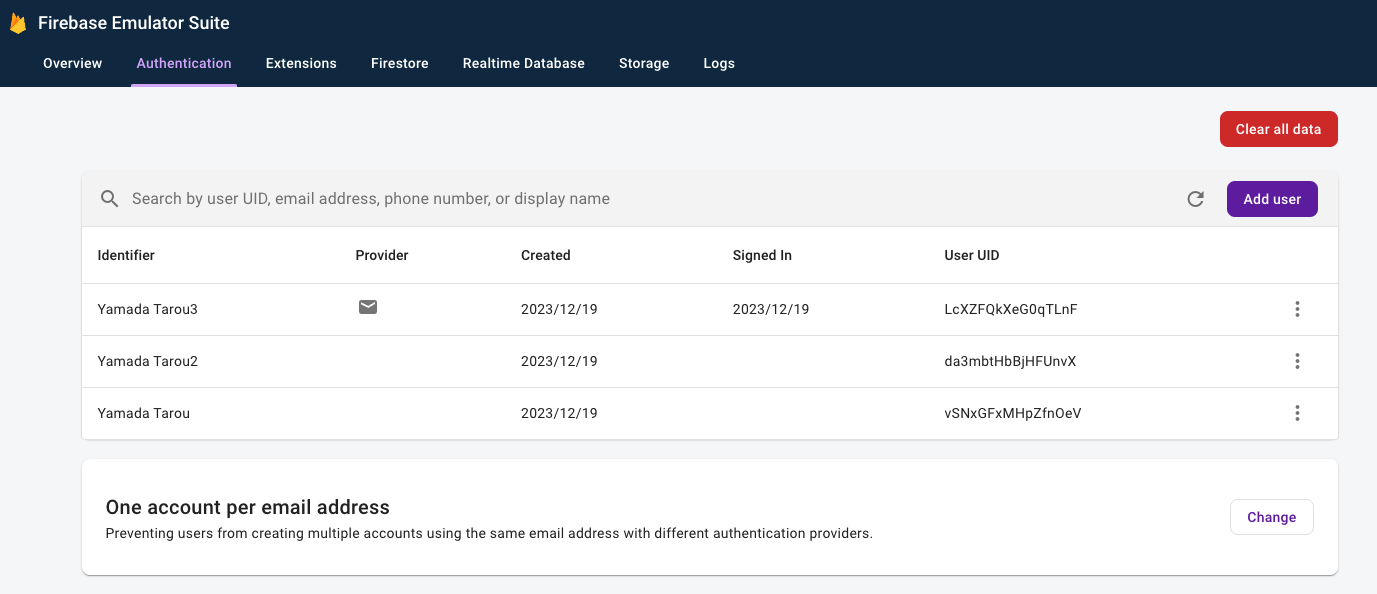
エミュレーターのGUIには次のURLでアクセスします。
```sh
http://127.0.0.1:4000/auth
```
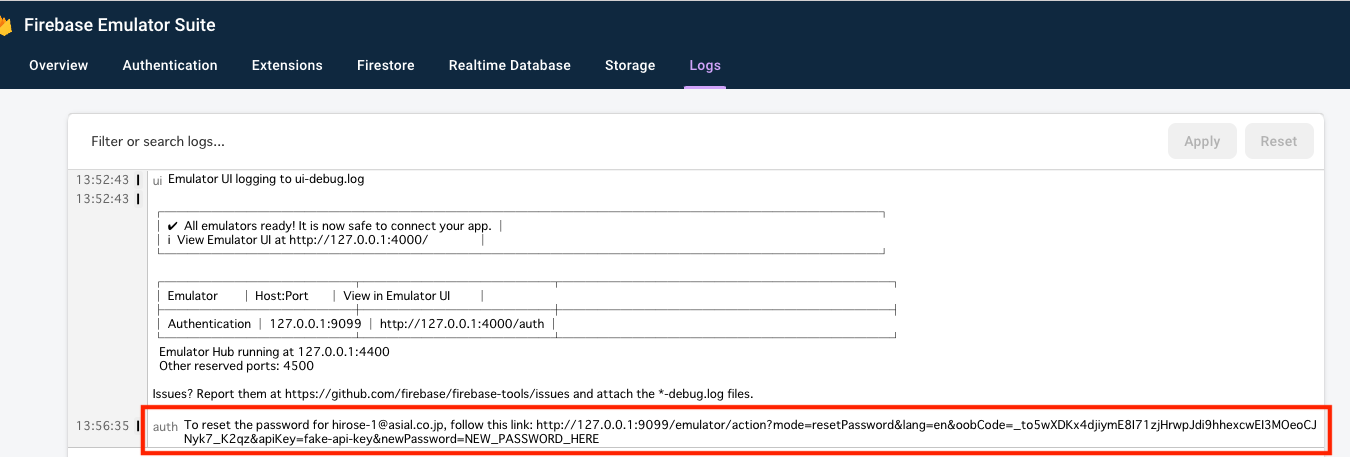
 #### エミュレーター利用時のパスワード再設定メールについて
エミュレーターを利用すると、パスワード再設定メールは送信されません。 その代わり、エミュレーターGUIの「Logs」タブにリンクがURLが表示されます。 URLの「NEW\_PASSWORD\_HERE」の部分を新しいパスワードに置き換えて、ブラウザからアクセスしてください。パスワードが更新されます。
#### エミュレーター利用時のパスワード再設定メールについて
エミュレーターを利用すると、パスワード再設定メールは送信されません。 その代わり、エミュレーターGUIの「Logs」タブにリンクがURLが表示されます。 URLの「NEW\_PASSWORD\_HERE」の部分を新しいパスワードに置き換えて、ブラウザからアクセスしてください。パスワードが更新されます。